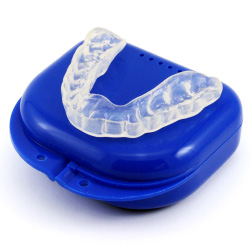
Night Guard Impressions
28th Sep 2025

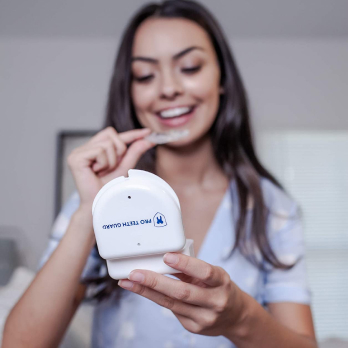
Taking a night guard impression at home might seem tricky, but it’s actually pretty simple! With a few easy steps, you can create a perfect mold for a comfortable, custom-fit night guard.
It’s normal to worry about making mistakes, but don’t stress—we’ll walk you through each step, offer tips to avoid common mistakes, and help you feel confident about taking your night guard impression at home.
How to Take a Dental Night Guard Impression at Home

Taking a night guard impression at home is simple when you follow these 5 easy steps. Let’s walk through the process to make sure your impression comes out perfect the first time!
Materials You’ll Need!
Before you start, make sure you have everything from your impression kit:
- Impression tray
- Two types of dental putty (usually a base and catalyst)
- Clear step-by-step instructions
- Gloves (optional, but helpful)
- Timer or phone stopwatch
Tip: Have a mirror nearby—it’ll help you position the tray correctly.
Step 1: Prepare Your Work Area
Find a clean, well-lit space to work, wash your hands thoroughly, and set out all the materials within easy reach.
Step 2: Mix the Impression Putty
Take the two types of putty (usually one white and one colored) and knead them together until they blend into a solid color, working quickly as you’ll have about 60 seconds before the putty starts to harden.
Tip: If the putty feels too firm or crumbly, it may have hardened too fast. Don’t worry—you can request extra putty if needed.
Step 3: Load the Tray
Roll the mixed putty into a log shape and place it evenly into the impression tray, pressing it in so it’s snug but still has a little height for your teeth to sink into.
Step 4: Take Your Impression
Center the tray with your teeth and press it up (or down) firmly so your teeth sink into the putty. Keep the tray still and hold it in place for 3-4 minutes while the putty sets. Breathe through your nose and relax—this part takes a little patience!
Tip: Avoid biting into the tray — you should keep your teeth still and push the tray into your teeth. Biting into the tray may cause distortions in your impression.
Step 5: Remove and Check Your Impression
Gently wiggle the tray loose and pull it out, then check the impression to ensure you can see clear outlines of your teeth, including the gum lines and tooth edges.
Related Articles:
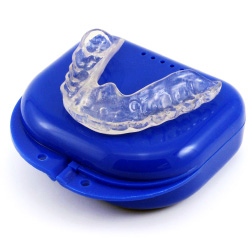
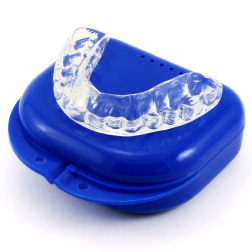
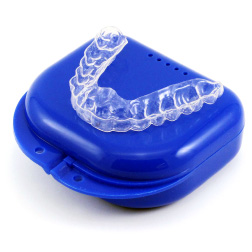
What Does a Good Night Guard Impression Look Like?

When you’re finished, you should see clear impressions of your upper and lower teeth in the putty. Make sure you can clearly see every tooth, from your front teeth to your back molars. You should also be able to see the gums around your back molars and the palate behind your front teeth.
Inspect your impressions to ensure there is only one indentation for each tooth. You should not see multiple impressions within the putty.
While the impressions should be deep and clear, they should not be so deep that there are holes in the putty. Inspect the putty to make sure you have clear impressions with no holes.
You should also see a deep impression where each tooth’s internal and external structure is visible. If your impressions seem small or narrow, you may have waited too long to begin taking the impression.
Common Mistakes and How to Fix Them
It’s totally normal to make a few mistakes when taking your night guard impression—especially if it’s your first time. Most issues are easy to fix, and we’re here to help! Here are some common mistakes and simple solutions:
1. Shallow Impression or Putty Hardening Too Fast
The Problem: Your teeth didn’t sink deep enough into the putty, or the putty hardened too fast before you could take the impression. This can make the details unclear.
How to Fix It: Work quickly when mixing the putty so it stays soft long enough. Press the tray firmly and evenly to ensure your teeth sink deep enough. Use a mirror to check that the putty reaches your gum line. Keep the putty at room temperature before mixing to prevent early hardening. Have everything ready before you start to avoid delays.
Tip: Hold the tray steady while the putty sets. If it hardens too soon, mix fresh putty and try again!
2. Double Printed Impressions
The Problem: Your teeth left multiple impressions in the putty, making the mold unclear. This happens when the tray moves or if you apply uneven pressure while taking the impression.
How to Fix It: Push the tray into your teeth with one smooth, firm motion and hold it steady while the putty sets. Avoid wiggling or adjusting the tray once your teeth are in place, as this can create overlapping impressions.
Tip: Use both hands to press the tray evenly and keep your head still to prevent accidental movement.
3. Putty Isn’t Evenly Mixed
The Problem: If the two putties aren’t fully blended, the impression may have weak spots or inconsistencies, affecting accuracy. This can lead to a poor-fitting night guard.
How to Fix It: Knead the two putties together until they form a single, uniform color with no streaks. Work quickly but thoroughly to ensure even mixing before placing the putty in the tray.
Tip: Mix the putty for about 30-40 seconds using your fingertips, not your palms, to prevent it from warming up too fast.
4. Tray Size Is Too Small
The Problem:If the impression tray is too small, your teeth may press against the edges, preventing a proper mold. This can lead to an inaccurate fit and discomfort when wearing your night guard.
How to Fix It: Before mixing the putty, test different tray sizes to find the best fit. Your teeth should sit comfortably inside the tray with a little wiggle room, and they should not touch the outer edges. If the provided trays feel too tight, contact customer support for a larger size.
Tip: Choose a tray that allows enough space for the putty to surround your teeth fully while still feeling secure in your mouth.
5. Uneven or Crooked Impression
The Problem: The tray wasn’t centered, causing the impression to be off-balance.
How to Fix It: When positioning the tray, use a mirror to center it over your teeth before pressing down, and ensure the tray stays level while the putty sets.
Tip: Practice holding the tray in place before adding the putty.
- Most Popular
- Hard Outside, Soft Inside
- 2MM Thick
- Moderate / Heavy
- Most Durable
- Hard Materials
- 1.5MM Thick
- Heavy / Severe
- For Day Time Use
- Thin, Barely Visible
- 1MM Thick
- Light / Moderate
- For Clenching
- Flexible & Soft
- 1.5MM Thick
- Light / Moderate
Does the Impression Affect the Effectiveness of the Mouth Guard?
Getting an accurate impression is extremely important. The impression needs to be an exact model of your mouth and teeth so your new guard or splint fits snugly and performs its job.
A perfect impression will protect your teeth and jaw from TMJ and bruxism and the painful symptoms that come with them. This is exactly what sets a professionally-made night guard apart from an over-the-counter, one-size-fits-all guard.
Study shows that an ill-fitted night guard may be uncomfortable, which could lead to jaw pain and soreness. Any discomfort from a less than perfect night guard will make you less likely to wear the device consistently.
Additionally, a poor-fitting night guard can actually shift your teeth. According to Paul G. Mathew, MD, in an article for Harvard Health, “If a night guard doesn’t fit well, it can actually cause shifting of teeth and worsen TMJ symptoms” (2017).
By carefully following the impression instructions and inspecting your completed impressions, you can ensure you’ll have a perfectly fitted guard that protects your teeth.
Related Articles:
- How Should a Night Guard Fit?
- How to Get Used to Wearing a Night Guard
- Wearing a Night Guard: Pros and Cons
Do Dental Impressions Hurt?
Although the impression process may feel uncomfortable, taking impressions should not be painful. If you tend to feel anxious at dental offices, taking impressions at home may make the whole process more comfortable for you.
Here are some other tips to make the impression process more comfortable:
- To prevent gagging, breathe through your nose and sit up while taking the impression
- If your teeth and jaw are already sore due to your bruxism, consider taking an over-the-counter pain reliever before taking your impressions
- Brush your teeth or rinse your mouth after you’re done taking impressions to remove any debris or bad taste
If you have small protrusions in your mouth, known as tori, an at-home impression kit is likely not for you.
You might also want to have your impressions taken in a dental office if you have trouble opening your jaw wide enough or if you have loose teeth. In both of these cases, talk to your dentist about the best way to have impressions taken.
FAQs About Night Guard Impressions
1. What if I have braces, crowns, or missing teeth?
Yes, you can still take a night guard impression! The putty will shape around braces, crowns, and even gaps from missing teeth. Just make sure it captures all the details. But if you have loose teeth or dental work that might come off, check with your dentist first.
2. How long does the entire process take?
The impression itself only takes about 10–15 minutes from start to finish.
3. Is an at-home impression as accurate as one from a dentist?
Yes! Our at-home kits use the same dental-grade materials that many dentists use. As long as the impression is taken correctly, the end result will be just as precise — but much more convenient and affordable.
Conclusion
Taking a night guard impression at home might seem a little overwhelming at first, but with the right guidance and a little patience, it’s actually a simple and stress-free process. Remember, the goal is to get a clear and accurate mold so your custom night guard fits perfectly—offering the comfort and protection you need.
If your first attempt doesn’t turn out as planned, don’t worry. It’s common to need a redo, and we’re always here to help. With a bit of practice and the tips in this guide, you’ll have a great impression in no time.
Ready to get started? Order your custom night guard kit today and take the first step toward better, more comfortable nights—your smile will thank you!
References:
- Colgate. (2023, January 9). Getting dental impressions? Here's what to expect. https://www.colgate.com/en-us/oral-health/bridges-and-crowns/dental-impressions-what-to-expect
- Mathew, P. G. (2020, August 5). Unlocking the lock jaw: Temporomandibular joint dysfunction. Harvard Health Publishing. https://www.health.harvard.edu/blog/unlocking-the-lock-jaw-temporomandibular-joint-tmj-dysfunction-2017022211146
- Bereznicki, T., Barry, E., & Wilson, N. H. F. (2018). Unintended changes to the occlusion following the provision of night guards. British Dental Journal, 225(9), 715–722. https://doi.org/10.1038/sj.bdj.2018.869
- Colgate. (2023, January 9). What are mandibular tori? https://www.colgate.com/en-us/oral-health/mouth-and-teeth-anatomy/what-are-mandibular-tori
- Most Popular
- Hard Outside, Soft Inside
- 2MM Thick
- Moderate / Heavy
- Most Durable
- Hard Materials
- 1.5MM Thick
- Heavy / Severe
- For Day Time Use
- Thin, Barely Visible
- 1MM Thick
- Light / Moderate
- For Clenching
- Flexible & Soft
- 1.5MM Thick
- Light / Moderate